Audio interface
Learn some key techniques in creating interface elements in this two part tutorial...
1

Whether your designing an application Interface, a skin or inventing a new audio player, you'll find yourself using these techniques in all of them. Obviously I cannot sit here and type out every step on creating an interface since it would have to be a basic interface, but I can teach you how to create some of the elements that make a good interface.
Before we start, If you don't have a good deal of spare time/patience and pretty good knowledge of photoshop and its tools I wouldn't attempt this tutorial yet. I will not be held responsible for any loss of hair as a result of following this tutorial.
Lets get started
You'll want to start with a fairly large image, typically I will start with a 500px x 500px canvas at with a resolution of 72 pixels/inch with a white background.
It can be scary staring at a blank white canvas, so why not paste your favorite wallpaper or background onto your image, make sure it is very light, so maybe lower the opacity.
2
Let start with the main shape. For this tutorial I'm going to be keeping it fairly simple, based on a mini disc remote. Here's how I like to create the shape.
Select a light gray as your foreground: #E5E5E5 grab the rounded rectangle tool
Match your options like mine: rounded rectangle, radius 50, colour grey.
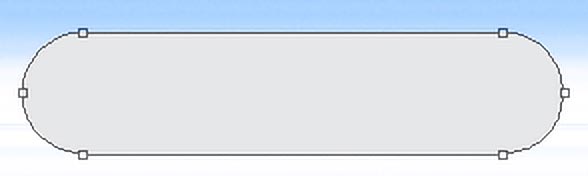
Now create a new layer and simply draw out a large pill shaped bar. About the size of mine below.

Ok, now if you ask me, its a bit plain, so why not manipulate it. This is why we use the vector shape tools in photoshop, since then we are able to edit our shapes.
To manipulate the shape, select the direct selection tool.
Click the center of your shape to highlight the path. Now click along the path so that all the anchor points can be seen.
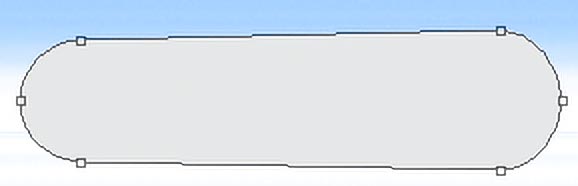
Still with the direct selection tool active, click the anchor point in the top right so it becomes black. Now on the keyboard nudge the point up 5times (5 pixels).
Now do the same with the bottom right anchor point.
It should look like this:
At the moment it looks like an un-even pill shape. Next grab the ADD ANCHOR POINT tool found by right clicking on the pen tool in the toolbar.
Click along the path in the same places I have below to add two new anchor points.
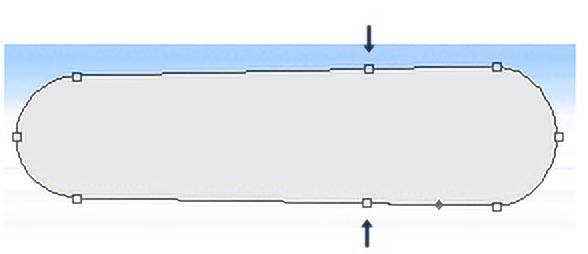
Now using the Direct selection tool again. Select the top anchor point you just Added by clicking on it and press down on the keyboard 4 times to nudge it down 4 pixels. Do the same with the bottom anchor point you just created except nudge it 4px's up instead of down.
If you did that correctly, it will look like this.

Press CTRL + H to hide the path and look at your smooth shape.
Now we are done creating our main shape, but since we did it as a path we can easily modify it later if we need to which is always a good bonus.
TIP: try to create as much of your interface using paths/shape tools, since they are vector and will always be better quality and you'll always be able to edit them.
Select a light gray as your foreground: #E5E5E5 grab the rounded rectangle tool
Match your options like mine: rounded rectangle, radius 50, colour grey.
Now create a new layer and simply draw out a large pill shaped bar. About the size of mine below.
Ok, now if you ask me, its a bit plain, so why not manipulate it. This is why we use the vector shape tools in photoshop, since then we are able to edit our shapes.
To manipulate the shape, select the direct selection tool.
Click the center of your shape to highlight the path. Now click along the path so that all the anchor points can be seen.
Still with the direct selection tool active, click the anchor point in the top right so it becomes black. Now on the keyboard nudge the point up 5times (5 pixels).
Now do the same with the bottom right anchor point.
It should look like this:
At the moment it looks like an un-even pill shape. Next grab the ADD ANCHOR POINT tool found by right clicking on the pen tool in the toolbar.
Click along the path in the same places I have below to add two new anchor points.
Now using the Direct selection tool again. Select the top anchor point you just Added by clicking on it and press down on the keyboard 4 times to nudge it down 4 pixels. Do the same with the bottom anchor point you just created except nudge it 4px's up instead of down.
If you did that correctly, it will look like this.
Press CTRL + H to hide the path and look at your smooth shape.
Now we are done creating our main shape, but since we did it as a path we can easily modify it later if we need to which is always a good bonus.
TIP: try to create as much of your interface using paths/shape tools, since they are vector and will always be better quality and you'll always be able to edit them.
3
We created the shape, now we want to make it stand out and look realistic. I'm going for a smooth metal appearance. One thing I personally do, is when adding texture/bevel to my shape I try to do it all using layer styles, why? Because then I'm able to save each style and apply it to other parts of the same interface I may make earlier. It saves you LOADS of time and still looks good.
So on your shape layer, go to Layer>Layer style>Gradient overlay.
Enter these settings: Blend mode normal, opacity 10, colour- gradient (black-white), angle 90, style linear, angle 90, scale 34.
Now add a Satin Layer style with these settings: Blend mode normal, colour black, angle 19, distance 11, size 14, invert.
Next add a Bevel and emboss style with these settings: Style inner bevel, technique smooth, depth 100, direction up, size 9, soften 6, angle 90, altitude 6, highlight mode screen, opacity 75, colour white, shadow mode multiply, opacity 0.
Now an Inner glow layer style with these settings: Blend mode normal, opacity 21, noise 0, colour black, technique softer, source edge, choke 0, size 5.
Now we need an Inner Shadow with these settings: Blend mode multiply, colour black, opacity 17, angle -87, distance 5, choke 16, size 6.
And last but not least a drop shadow: Blend mode multiply, colour black, opacity 17, angle 90, distance 3, spread 0, size 3.
If you save your layer style by clicking the style button at the top of the styles palette then clicking "New Style", you can use it again and again, later on.
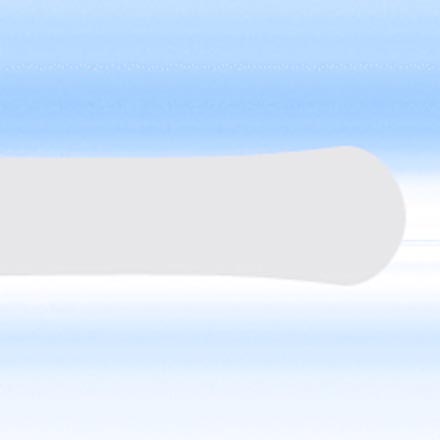
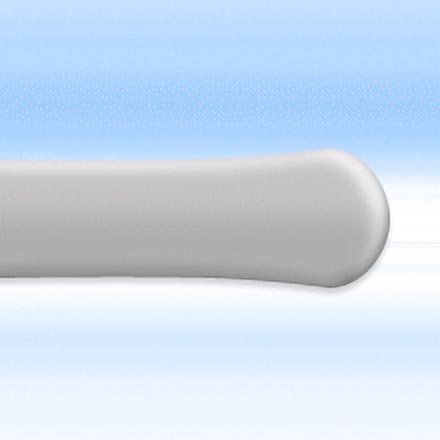
Once done click ok, and it should look something similar to mine opposite.
So on your shape layer, go to Layer>Layer style>Gradient overlay.
Enter these settings: Blend mode normal, opacity 10, colour- gradient (black-white), angle 90, style linear, angle 90, scale 34.
Now add a Satin Layer style with these settings: Blend mode normal, colour black, angle 19, distance 11, size 14, invert.
Next add a Bevel and emboss style with these settings: Style inner bevel, technique smooth, depth 100, direction up, size 9, soften 6, angle 90, altitude 6, highlight mode screen, opacity 75, colour white, shadow mode multiply, opacity 0.
Now an Inner glow layer style with these settings: Blend mode normal, opacity 21, noise 0, colour black, technique softer, source edge, choke 0, size 5.
Now we need an Inner Shadow with these settings: Blend mode multiply, colour black, opacity 17, angle -87, distance 5, choke 16, size 6.
And last but not least a drop shadow: Blend mode multiply, colour black, opacity 17, angle 90, distance 3, spread 0, size 3.
If you save your layer style by clicking the style button at the top of the styles palette then clicking "New Style", you can use it again and again, later on.
Once done click ok, and it should look something similar to mine opposite.
Now, As you can see we have created our main shape for all of our elements to sit on using really just two tools, the pen/shape tools and layer styles. We are now going to move on and learn how to add things to our base.
This tutorial was brought to you by Robouk, please post any questions in the forum. Thank you.