Tentacle tubes
Create some smooth tentacles using photoshops airbrush tool...
1

So you want to create those tentacles but you don't have any 3D apps right? who needs 3D anyway.
This tutorial will be a little more advanced just showing you a few steps. This effect never comes out the same, what you will get will be quite random but hopefully it will look cool.
Start with a new image, to be on the safe side make it about 800x800 px with a white background.
Now I'm going to be creating these plastic looking tentacles but you can do any type you want.
Start by selecting the "Polygon Lasso" from the toolbar now draw a tentacle triangle pointing down, make it as neat as you can. You will probably need to do this zoomed out.
Once you have done it, fill the selection in with your colour, I'm using #8FCFFF. Deselect (CTRL + D)
With a bit of luck you'll have something similar to Mine.
2
Now for the neat part. Go to Filter>Distort>Shear. OK what you need to do here is click along the line and drag parts to make it squiggle.
When you click OK it will transform your shape into a squiggle err tentacle shape.
There you just learnt how to make your tentacle shapes.
Thanks to Allgood of Geda-online for sharing this nifty technique, go check him out.
When you click OK it will transform your shape into a squiggle err tentacle shape.
There you just learnt how to make your tentacle shapes.
Thanks to Allgood of Geda-online for sharing this nifty technique, go check him out.
3
Now use the Free transform (CTRL + T) to rotate or resize your tentacle to taste, press enter to apply it.
That was the easy part, yes the easy part.
Now we need to use my favourite tool, the airbrush.
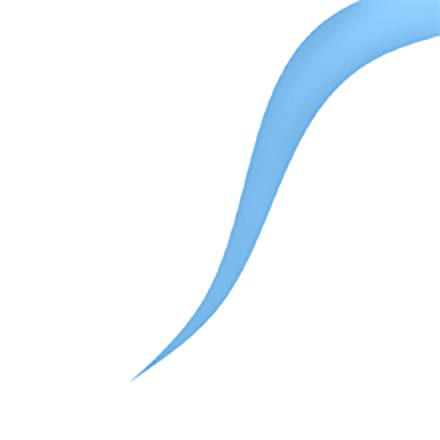
The first step I took was to Select the tentacle shape (HOLD CTRL and click on the layer) now create a new layer above the tentacle one. Using the airbrush at about a size of 200-300 blurred 100% paint around the edges of the tentacle, to give it a beveled effect. You may want to mess with the layers opacity to get this to look how you like it. Refer to my image to the left if you need to. Its starting to look cool now, well soon.
That was the easy part, yes the easy part.
Now we need to use my favourite tool, the airbrush.
The first step I took was to Select the tentacle shape (HOLD CTRL and click on the layer) now create a new layer above the tentacle one. Using the airbrush at about a size of 200-300 blurred 100% paint around the edges of the tentacle, to give it a beveled effect. You may want to mess with the layers opacity to get this to look how you like it. Refer to my image to the left if you need to. Its starting to look cool now, well soon.
4
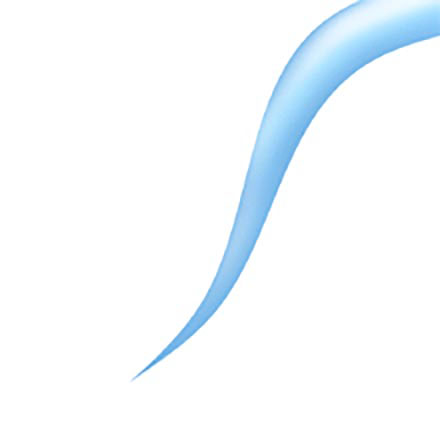
Now its just a case of using the airbrush to paint highlights and shadows using the airbrush, Select the tentacle and do each part on a new layer, next, I'm using an aqua colour to add highlights to my tentacle. Here is a tip, you can set your airbrush to fade after a certain amount of steps, this comes in handy often, you can find this option in you got it the options.
Another thing to do is to use Filter>Blur>Gaussian Blur to blur parts that you have airbrushed (that's why you must do each part on a new layer).
Left is a shot after I have added a aqua highlight and a white highlight.
Starting to look god now, nearly done.
Another thing to do is to use Filter>Blur>Gaussian Blur to blur parts that you have airbrushed (that's why you must do each part on a new layer).
Left is a shot after I have added a aqua highlight and a white highlight.
Starting to look god now, nearly done.
5

Now all is left to do is to HOLD CTRL and click on the original tentacle shape layer (layer 1 for me).
Now with a darker blue as your foreground colour go to Edit>Stroke, use a setting of about 2 its up to you here.
This just darkens up the edges. Basically the rest is down to you, what I did is added a drop shadow (faint dark blue) and duplicated a few after merging them.
Once you duplicate them, rotate them, free transform them etc. etc. You may even want to do the Shear" filter on some of them again to reshape them.
Don't expect to be perfect at this first time, it will take a little practice until you get what you intended. Just have fun and experiment.
6

Do the same effect but try for different styles, its basically done in the same way, mostly with the airbrush... Its probably easier than you think. Have fun with it. I'd like to see what you guys can do with it so please if you make something, post it in the forum for me to see, thanks.
This tutorial was brought to you by Robouk, please post any questions in the forum. Thank you.