Polygon Crystals
These very trendy crystals make great wallpapers, learn how to create them ...
This an illustration of one way to do what's become knows as "polygon crystals". Actually I don't see what makes them crystals - they look more like reflective 3d shapes to me! but what do I know!
Start with a good high res. file - the exact resolution for this one is not important but it will look better if you work nearer to print res. Make sure that you interpolation is set to Bicubic - this means that your transformations and resamplings will be the highest quality that PS can achieve.
Click here to see Result
1
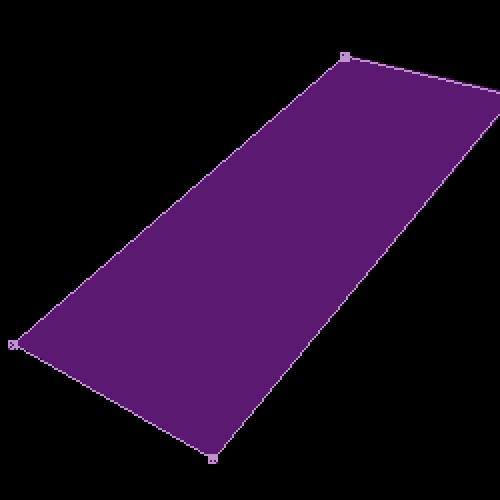
First we will create our basic shape - Use the pen tool to draw an straight edged outline (actually it can be any shape you want) - I've gone for a kind of perspective shape- save the path so you don't lose it! Now fill the path on a new layer with a colour of your choice. Use a colour with a brightness setting of about 50%- in the colour picker the first three variables are H,S and B, its the B that should be 50%.
2
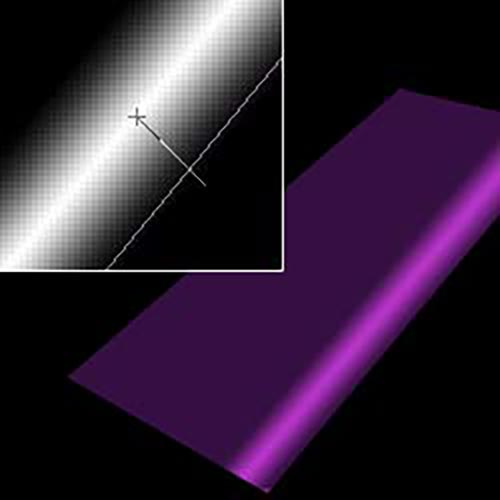
Now we are going to create the reflection - where the light catches the edge of our shape. Make a new layer - and create a clipping group with the layer beneath - this is done by option clicking the dividing line between the layers (for those of you who don't know).
Reset your colours and choose the foreground to background gradient. Choose the reflected gradient tool.
Draw your gradient at right angles to the edge of your shape (see the detail left). Here you can either redraw your gradient until you get it right, or free transform it until it lies along the edge of the shape as shown.
Now change the mode of this new layer to Overlay and drop the opacity down to 55%. Now you should have a basic 3D shape as seen left.
3

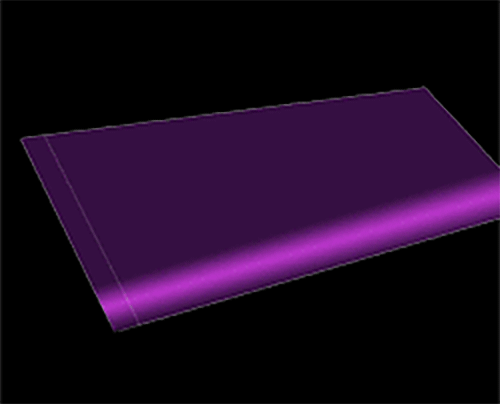
Now we are going to add a subtle stroke to the outside edge, and one also across the edge of the shape. Look at the shot of the layers palette left; First we'll make two more clipped layers above the main shape.
On the first layer control click the path you saved earlier, this will create a selection around the shape. Go to edit- stroke with a width of 1 pixel, and stroke inside with white. On the second layer create a single pixel line with the line tool directly in parallel to the edge of the shape. It doesn't matter if it goes over the edge, because of the clipping group.
Now change both layers to Screen mode and drop the opacity to about 65%. Now we if we are happy with our basic shape we can merge the layer set- highlight the set icon and hit control E.
4
From here on in I will describe how I made the image above, but its better to try and come up with your own composition.
The first thing is to duplicate your shape a many times as you need and free transform them. Use free transforms "distort" setting - this gives you the most freedom. For my image all the layers (except one) were left in normal mode. Try changing some of the objects to Screen mode also (and as many other modes as you can- what the hell!) - this will give more variety and dynamics to the image.
The first thing is to duplicate your shape a many times as you need and free transform them. Use free transforms "distort" setting - this gives you the most freedom. For my image all the layers (except one) were left in normal mode. Try changing some of the objects to Screen mode also (and as many other modes as you can- what the hell!) - this will give more variety and dynamics to the image.
5

The "glows" at the top right of the image were created with radial gradients, transformed and the layer mode changed to "Screen".
In addition to this I created some polygon objects, duplicated them and used Colour Dodge at a low opacity.
Here is a useful hint; If your using version 6 and your using using colour dodge, make your opacity changes with the advanced blending slider - this gives a much more subtle transition. The PS6 version of colour dodge is, to put it mildly crap, and you have to work around it all the time! Hey ho - you win some you lose some!
6
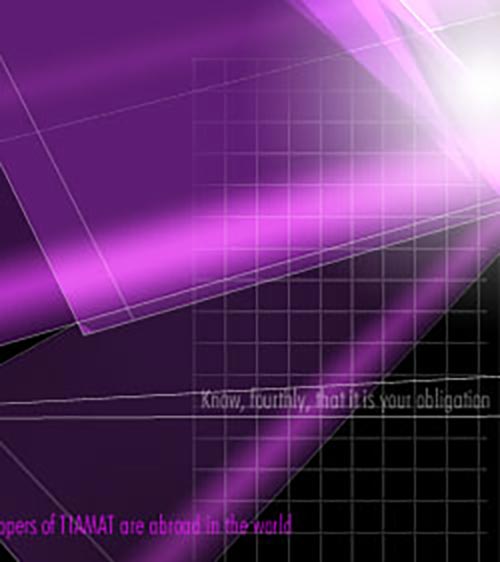
I've added some grids (I know grids ..but that's another story), and some type. Just create a pattern for the grid - keep the line narrow, about 1 pixel. I changed the blend mode to Lighten, set the opacity very low (25%), and added a layer mask to fade the edge. For the type I've used Futura/light/condensed (but you can use any damn thing you want for this!)
There you are, another masterpiece! hope you enjoy.
There you are, another masterpiece! hope you enjoy.
This tutorial was by [email protected], brought to you by Robouk, please post any questions in the forum. Thank you.