Pixel borders
We have all seen those mini-beveled borders that sections some websites content, now lets create them...
1

We have all seen those sites that section there sites content inside little miniature beveled borders and its becoming more and more popular.
Its quite easy to create so here is how..
First up, start with your image, about 600x600px with a white background.
Ok first of all to make life easier, fill in the background layer with a mid-gray colour so we can help see the details of our borders. #E5E5E5 is a reasonable colour. As you can see I am using a grid background but that's not really important right now.
2
Now, use the rectangular marquee tool to make a rectangle selection roughly the size you would like your border to be. Once you are done, Create a new layer. Press D then X on the keyboard to reset your colours. Now go to Edit>Stroke and choose 1 px make sure the colour is set to white and Dot "centre". Then click ok. You should have a very faint white line that's hard to see, you do? great. Do not Deselect. Create another new layer and fill the selection in white.. (Edit>fill). Now press CTRL + D to deselect. You should now have what looks like a white rectangle, that's cause it is a white rectangle.
Click on the original layer 1 in the layers palette (the layer with the thin white line on it) so it becomes the active layer.. Now drag layer 1 above Layer 2 so the layers palette is like the one shown opposite.
Click on the original layer 1 in the layers palette (the layer with the thin white line on it) so it becomes the active layer.. Now drag layer 1 above Layer 2 so the layers palette is like the one shown opposite.
3
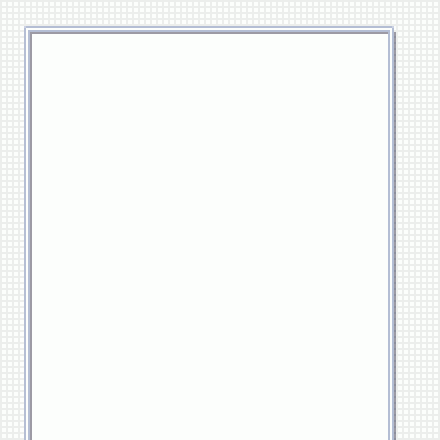
Ok, now for the good part. We are going to apply some layer styles to our thin line. Go to Layer>Layer Style>Stroke Match your setting: size 1, position outside, blend mode normal, opacity 100, colour B6BCD7, you may choose to modify the stroke colour slightly.
Once done click on the left to add a Drop Shadow to your border.
Match your settings with these: Blend mode multiply, opacity 44, angle 145, distance 3, spread 100, size 0 .When done you can click ok.
TIP: You can save styles by clicking the styles tab at the top then clicking "New style" you will then be able to do this easier next time.
It should look something like what I have opposite.
4
Now its nice, but it lacks the details what really make these things look good. So what we going to do now? Add details.
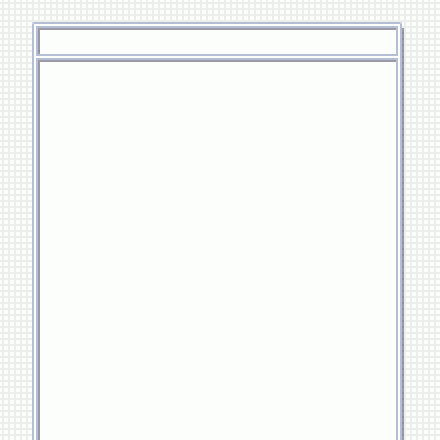
First of all, we want to section a part at the top of the border. This couldn't be easier. Make sure layer one (or the layer with your border on it) is your active layer. Grab your line tool and use these settings:weight 1px not anti-alised.
Paint near the top of your rectangle with white as your foreground colour, (HOLD SHIFT TO GET A STRAIGHT LINE) and you'll notice it becomes instantly mini beveled. Whoa... this may take a few tries to get it looking good but its easy enough. It should hopefully look something similar to mine opposite.
5

Now you can call your self a pixel artist, well almost.
I added a mini-beveled rectangle inside the section we just made, you can learn more about pixel beveling and how to make them here.
With a little bit more effort you can have something like I have opposite. Its pretty easy to make too.
Remember to save any styles you create so you can use them later with ease, this will save you big time.
Hope you enjoyed the tutorial. Be sure to post any interesting creations in the Forum.
This tutorial was brought to you by Robouk, please post any questions in the forum. Thank you.