Christmas lights
Create these realistic low voltage lights that will spice up any tree err website...
1

These lights will spice up any image/site/card you make for christmas, they are quite realistic whilst remaining fairly simple to create. So lets get started.
Create a new image about 600x600 pixels with a white background.
Grab your line tool and enter these settings: Arrowheads, Start, width 500, length 700, concavity -40.
Create a new layer and draw a arrow like shape as show (Hold shift, it makes life easier).
Now hold CTRL and click on the shapes layer to select it.
Switch to the channels Tab and create a new channel.
Fill the selection in white and press CTRL + D to deselect.
Now go to Filter > Blur > Gaussian blur and enter a setting of 3.5.
Now Press CTRL + L to bring up the Levels panel.
Enter these settings: input levels, 80, 1, 113.
Hit OK.
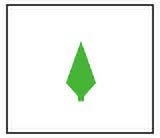
You should have a strange looking egg shape, you do? great.
Hold CTRL and click on the channel named Alpha 1 to select your egg.
Go back to your LAYERS palette and click the create a new layer icon.
On the new layer fill your selection in with the colour: #42B031.
Now DELETE the layer with the original shape that you drew with the line tool on it by dragging it into the bin icon.
You should be left with an image that looks like a green egg.
Create a new image about 600x600 pixels with a white background.
Grab your line tool and enter these settings: Arrowheads, Start, width 500, length 700, concavity -40.
Create a new layer and draw a arrow like shape as show (Hold shift, it makes life easier).
Now hold CTRL and click on the shapes layer to select it.
Switch to the channels Tab and create a new channel.
Fill the selection in white and press CTRL + D to deselect.
Now go to Filter > Blur > Gaussian blur and enter a setting of 3.5.
Now Press CTRL + L to bring up the Levels panel.
Enter these settings: input levels, 80, 1, 113.
Hit OK.
You should have a strange looking egg shape, you do? great.
Hold CTRL and click on the channel named Alpha 1 to select your egg.
Go back to your LAYERS palette and click the create a new layer icon.
On the new layer fill your selection in with the colour: #42B031.
Now DELETE the layer with the original shape that you drew with the line tool on it by dragging it into the bin icon.
You should be left with an image that looks like a green egg.
2

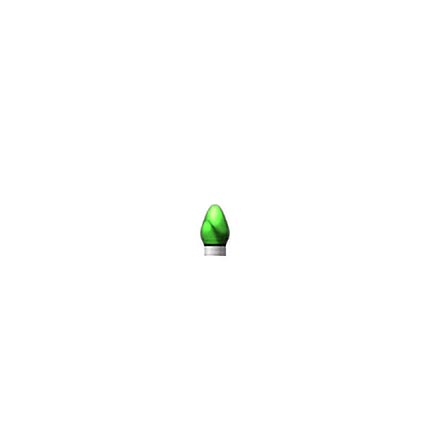
So, we have our shape for our lights, lets make it look realistic using layer styles.
With the Green bulb layer selected, go to Layer>layers style>Satin.
Enter settings:Blend mode multiply, colour black, opacity 63, angle 59, distance 10, size 2, invert.
Now add a Bevel and emboss: Style Inner bevel, technique smooth, direction up, size 18, soften 1, Highlight mode Colour Dodge white, Opacity 90, Shadow Mode Multiply black, Opacity 0, Angle 118, altitude 0, Depth 331.
Next up, wee need an Inner Glow: Blend mode normal, opacity 68, noise 0, colour black, technique softer, source edge, choke 0, size 2.
And last but not least, Add an Inner Shadow: Blend mode multiply, colour black, opacity 66, angle -75, distance 2, choke 0, size 5.
Its important that you get these styles correct, so spend the time in copying all the setting accurately.
When done, Click OK and it should look something like the image opposite.
3
Ok, now obviously our lights not going to work if it has now plug or wire, so wee will create that too.
Create a new layer above the bulb layer.
Set your foreground colour to: #9A9A9A.
Now select the rectangle shape tool with these settings:Fixed width, Width: 11px, Height: 5px.
Click once, just below the bulb to create a gray rectangle as shown below, if required, use the move tool to get it into place.
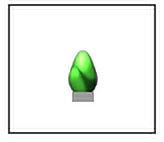
Press D then X to reset your colours.
Its better but its not the most realistic, so we will add some layer styles.
With the gray rectangle layer selected, go to Layer>Layer style>Gradient overlay.
Enter these settings:Blend mode:normal, Opacity:81%,Gradient:White -> Transparent White, Style:Reflected, Angle:180,Scale:92.
Next add an Inner Shadow:Blend Mode:Multiply, Colour:#000, Opacity:26%, Angle:0, Distance: 3px, Choke:0px,Size:1px.
And last but not least, Add a Drop shadow:Blend Mode:Overlay, Colour:#000,Opacity:82%, Angle:-90, Distance:1px, Spread:0, Size:0.
Again, it is very important you get these setting correct, you will only need to do it once if you save your layer styles.
TIP: To save a layer style in the layer styles palette, click the styles tab, then click the New style button. You will then be prompted to give your new style a name. When you are done, simply click ok.
Create a new layer above the bulb layer.
Set your foreground colour to: #9A9A9A.
Now select the rectangle shape tool with these settings:Fixed width, Width: 11px, Height: 5px.
Click once, just below the bulb to create a gray rectangle as shown below, if required, use the move tool to get it into place.
Press D then X to reset your colours.
Its better but its not the most realistic, so we will add some layer styles.
With the gray rectangle layer selected, go to Layer>Layer style>Gradient overlay.
Enter these settings:Blend mode:normal, Opacity:81%,Gradient:White -> Transparent White, Style:Reflected, Angle:180,Scale:92.
Next add an Inner Shadow:Blend Mode:Multiply, Colour:#000, Opacity:26%, Angle:0, Distance: 3px, Choke:0px,Size:1px.
And last but not least, Add a Drop shadow:Blend Mode:Overlay, Colour:#000,Opacity:82%, Angle:-90, Distance:1px, Spread:0, Size:0.
Again, it is very important you get these setting correct, you will only need to do it once if you save your layer styles.
TIP: To save a layer style in the layer styles palette, click the styles tab, then click the New style button. You will then be prompted to give your new style a name. When you are done, simply click ok.
4
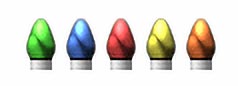
Ok, now the chances are you are going to be creating many lights cause one on its own well, it doesn't look good.
Rename both of your layers, rename the bulb layer "Bulb" and the base layer "Base". Make sense? I hope so.
Now, to keep things tidy I would do the following.
Create a new Layer set.
Rename the layer set to "Light". Now drag both the "Bulb" and the "base" layer into the new layer set.
Now, it couldn't be easier to duplicate the light, just drag the Layer set onto the Create new layer set icon: to duplicate the layer set (the same way you would a layer).
Changing the Colour
To change the colour of your light simply select the "Bulb" layer in the layers palette and Press CTRL + U on the keyboard. Tick the colorize box, also drag the saturation slider up a lot, move the hue slider to select the colour you want.
5
Adding Wire
Use the pen tool to add wire.
The pen tool is fairly easy to use you can learn more about it by jumping over to the Gurus Network.

To transform a light or rotate it, select that lights layer set and press CTRL T.
See what you can come up with and post your results in the forum.
Use the pen tool to add wire.
The pen tool is fairly easy to use you can learn more about it by jumping over to the Gurus Network.
To transform a light or rotate it, select that lights layer set and press CTRL T.
See what you can come up with and post your results in the forum.
This tutorial was brought to you by Robouk, please post any questions in the forum. Thank you.