Christmas holly
Create some prickly holly with the help of the custom shape tool...
1

Holly is great for decorating your front door, stairs and mantle piece as it is also great for decorating your webpage and images for christmas. I'll walk you through how you can create some in photoshop.
Start with a new image size 500x500 px with a white background.
Start by setting your foreground colour to #107310.
now, to create the shape for your holly grab the Custom Shape Tool.
from the shape drop menu, select the holly shape.
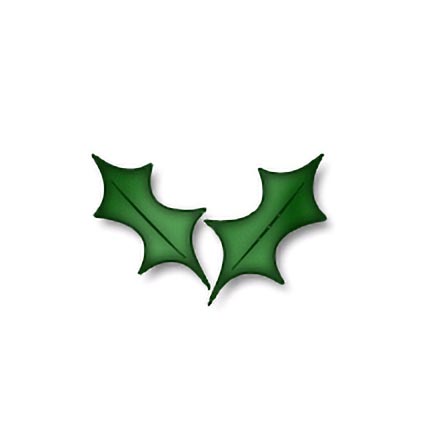
Now HOLD SHIT and drag with your mouse to create the holly to roughly the same size as mine opposite.
It should be the green colour we selected earlier, if not then fill it in with the green.
Start with a new image size 500x500 px with a white background.
Start by setting your foreground colour to #107310.
now, to create the shape for your holly grab the Custom Shape Tool.
from the shape drop menu, select the holly shape.
Now HOLD SHIT and drag with your mouse to create the holly to roughly the same size as mine opposite.
It should be the green colour we selected earlier, if not then fill it in with the green.
2
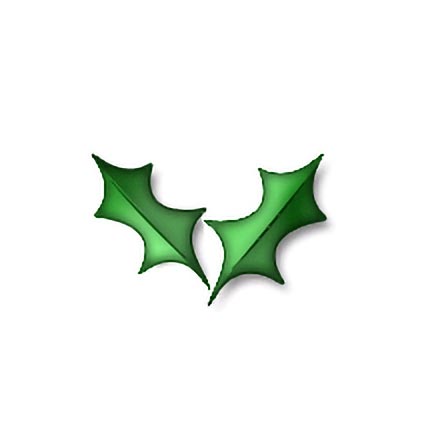
Now, we only want the Holly and not the berries, so using the Direct selection Tool.
Click on each berry separate and hit delete twice, this should remove the berry entirely.
You should be left with just your holly.
Now, add the following layer styles to your holly shape layer.
Layer>Layer style>Stroke
Use these settings: Size: 1px, Colour:#002C00.
Now add a Pattern Overlay: Opacity:27%, Pattern: Satin Pattern (From the "Patterns" pattern file).
Next up add an Inner Glow: Blend Mode:Normal, Opacity:46%, Color: Solid #000, Size: 5px.
And lastly, we need to add a drop shadow: Opacity: 51%.
Once you are done, click ok. It should look like mine opposite.
3
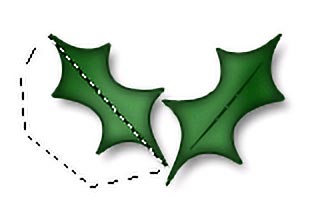
Now, Grab your Polygon Lasso.
What you want to do here is select HALF of each holly Leaf, as shown below.
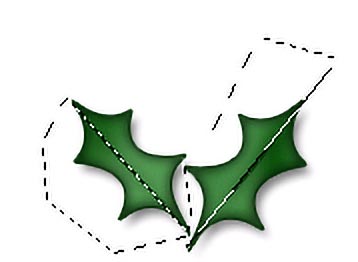
as you can see I have select the left side of the leaf.
Now HOLDING SHIFT, do the same with the 2nd leaf so that eventually you get something like this:
So both the left side of each leaf is selected.
Now add an Adjustment Layer by clicking the icon at the bottom of the layers palette.
From the menu that pops up choose "brightness/contrast" and enter these settings: Brightness: +50, Contrast +35.
Click ok, now your holly should look something like mine opposite.
What you want to do here is select HALF of each holly Leaf, as shown below.
as you can see I have select the left side of the leaf.
Now HOLDING SHIFT, do the same with the 2nd leaf so that eventually you get something like this:
So both the left side of each leaf is selected.
Now add an Adjustment Layer by clicking the icon at the bottom of the layers palette.
From the menu that pops up choose "brightness/contrast" and enter these settings: Brightness: +50, Contrast +35.
Click ok, now your holly should look something like mine opposite.
4

Just to finish my holly off I used the paintbrush tool and painted some spots using a brush I found in the palette.
here are the settings I used: Size: 32px, Brush: "Spatter".
I also set the layers blending mode to "colour dodge" and lowered the "fill opacity" of that layer down to 45%.
We are more or less done with our leaves now, lets make us some Berries.
here are the settings I used: Size: 32px, Brush: "Spatter".
I also set the layers blending mode to "colour dodge" and lowered the "fill opacity" of that layer down to 45%.
We are more or less done with our leaves now, lets make us some Berries.
5

For the berries, use the Ellipse tool to create a red circle. Use the red colour: #DA0514.
To give the Berries depth I added some layer styles, add an Inner Glow: Blend Mode: Normal, Opacity: 37%, Colour: #000, Size: 8px.
Then add an Inner Shadow: Opacity:69, Angle: -33, Distance: 5.
Draw around 3 berries close together as shown:

To give our berries some shine, create a new layer and simply use the paintbrush to draw a small round highlight in the top corner of each berry. Then once your happy with it, blur the highlight slightly by going to Filter >Blur>Gaussian Blur and using a setting of 1.2. See below for result:

To give the Berries depth I added some layer styles, add an Inner Glow: Blend Mode: Normal, Opacity: 37%, Colour: #000, Size: 8px.
Then add an Inner Shadow: Opacity:69, Angle: -33, Distance: 5.
Draw around 3 berries close together as shown:
To give our berries some shine, create a new layer and simply use the paintbrush to draw a small round highlight in the top corner of each berry. Then once your happy with it, blur the highlight slightly by going to Filter >Blur>Gaussian Blur and using a setting of 1.2. See below for result:
6
Your holly is now more or less complete and ready to decorate your website with.
You can create more than 2 leafs or 3 berries, just use the direct selection tool to keep duplicating leaves and berries.

Hope you enjoyed this tutorial, have fun experimenting.
Post any interesting creations in the Forum
You can create more than 2 leafs or 3 berries, just use the direct selection tool to keep duplicating leaves and berries.
Hope you enjoyed this tutorial, have fun experimenting.
Post any interesting creations in the Forum
This tutorial was brought to you by Robouk, please post any questions in the forum. Thank you.