Aqua pill
The famous aqua pill button with a difference, this ones easy to create...
1

Ok, lets be honest, the aqua pill isn't exactly new to anyone but here's an easy way to create it using your layer styles.
So lets start with a new image about 600px by 600px with a white background.
Create a new layer. Set your foreground colour to: #338FCE.
Now, select the rounded rectangle tool.
In the options bar that appears at the top, enter the following settings. Be sure to enter 91px by 27px in the fixed size box.
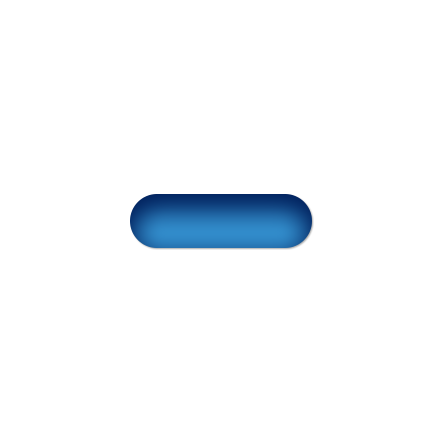
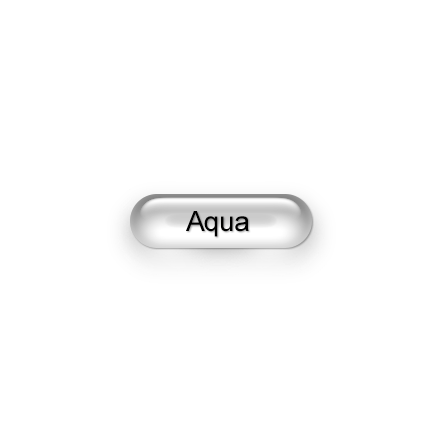
Now click once in the centre of your image to create a blue pill shape like mine opposite.
So lets start with a new image about 600px by 600px with a white background.
Create a new layer. Set your foreground colour to: #338FCE.
Now, select the rounded rectangle tool.
In the options bar that appears at the top, enter the following settings. Be sure to enter 91px by 27px in the fixed size box.
Now click once in the centre of your image to create a blue pill shape like mine opposite.
2
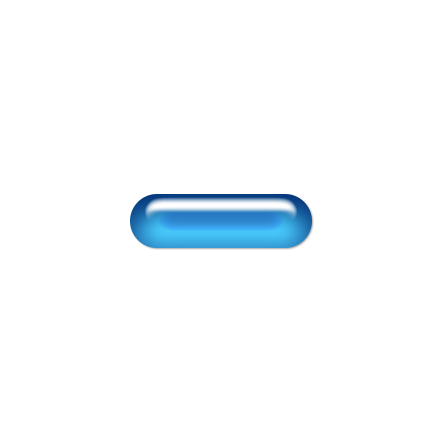
Now its time to add some layer styles, first a Drop shadow. Go to Layer>Layer style>Drop shadow Enter the following settings:
Blend mode multiply, colour black, opacity 33, angle 134, distance 1, spread 0, size 1.
Now add an Inner shadow with the following settings:
Blend mode multiply, colour 003871, opacity 100, angle 90, distance 6, choke 15, size 16.
If it looks like mine opposite so far, move on =)
Blend mode multiply, colour black, opacity 33, angle 134, distance 1, spread 0, size 1.
Now add an Inner shadow with the following settings:
Blend mode multiply, colour 003871, opacity 100, angle 90, distance 6, choke 15, size 16.
If it looks like mine opposite so far, move on =)
3
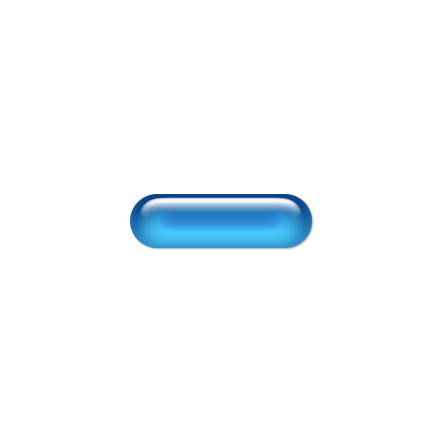
Now to give it the colour dodge look, we add a Inner glow with these settings:
Blend mode colour dodge, colour white, opacity 30, noise 0, technique softer, source centre, choke 22, size 21, range 31, jitter 0.
You need to make your own custom contour here. To do this click the contour picture and drag the points so it roughly creates a downward curve and flattens of.
Next up, we need to give it a highlight. To do this add a Bevel and Emboss layer style. Match your settings with these:
Style inner bevel, technique smooth, depth 81, direction up, size 9, soften 1, angle 90, altitude 73, highlight mode screen, opacity 100, colour white, shadow mode normal, opacity 100, colour 338FCE.
If its looking like mine, move on, your nearly done.
4
Now, we need to make the highlight look a little sharper, and this is where the use of the bevel and emboss contour style comes in handy. Add a contour layer style (under the bevel and emboss style setting). Choose "half Round" as your contour and immediately the highlight looks much better. Match these settings: contour half round, anti-aliased, range 69.
You are now done with the layer styles. You should save your layer style (by clicking "styles" at the top and then clicking "New Style" for later use, you then will not have to enter all those settings again. Click ok on the layer styles palette.
You are now done with the layer styles. You should save your layer style (by clicking "styles" at the top and then clicking "New Style" for later use, you then will not have to enter all those settings again. Click ok on the layer styles palette.
5
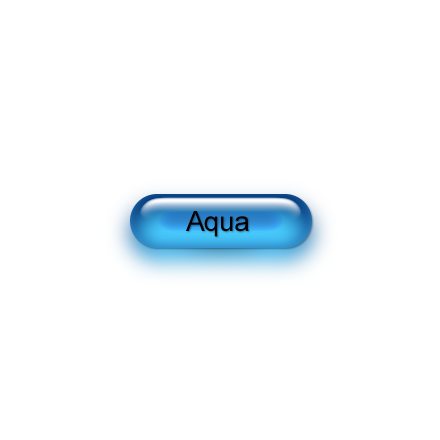
To make the button look even better, I like to add a sort of aqua shadow. This is fairly simple to do.
HOLD CTRL and click on the layer containing your button to select it. Go to Edit>Copy Merged.
Next create a new layer and drag it UNDERNEATH the layer with your button it it. Now go to Edit>Paste.
You will see no immediate change to your button.
Go to Filter>Blur>Gaussian blur and enter a radius of 5.6 then click ok.
Now select the move tool Hold DOWN shift and press the down arrow once on your keyboard to move the aqua shadow down. Done!
Now just add your text, I used font Arial at size 14pts
6
If you prefer your buttons in grey, click Layer > New adjustment layer > Black and white. Move the Cyans slider to 107 and Blues to 100 and voila! couldn't be easier.
Hope you enjoyed the tutorial, If you have made anything interesting with what you have learnt, post it for us all to see in the Forum. Thanks
Hope you enjoyed the tutorial, If you have made anything interesting with what you have learnt, post it for us all to see in the Forum. Thanks
This tutorial was brought to you by Robouk, please post any questions in the forum. Thank you.