3D Box
Make any cd cover or anything box shaped 3D ...
1
Here is a nifty think you can do, its actually very simple but can look like the work of a professional. =)
You can make things like cereal boxes, CD duel cases, software box's etc. etc. I will demonstrate a cereal box what I made for school.
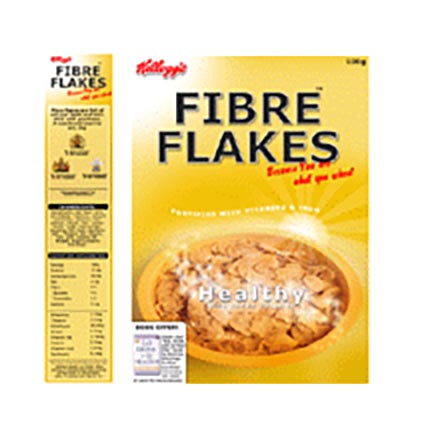
OK, first off, you will need the front of your box and the side to make the 3D box, have both ready.
Now you will probably need to resize your front to a smaller size, do this by going to.
Edit>Transform>Scale use the "options bar at the top" and remember how much you resized it by for layer... I'm going to resize my front AND side to 50% Lay it out like the image shows opposite.
2
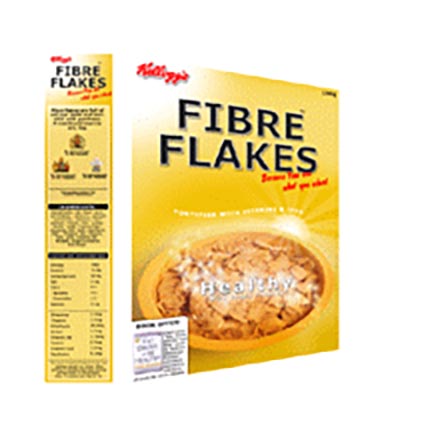
Now, Click on the layer that contains the front of your box to make that the active layer, go to Edit>Transform>Perspective now, you will see the points have surrounded the edge of your front image.
Click and drag the BOTTOM RIGHT corner up a little, this is to give it perspective. When you have it looking good, hit enter to apply it.
Now go to Edit>Free Transform, this time click the right side of your box and drag it left about an inch or so, basically your just squashing it all up (uh because that's what boxes look like). Again, when you are done hit enter to apply it. It will look like my pic opposite with a bit of luck.
3
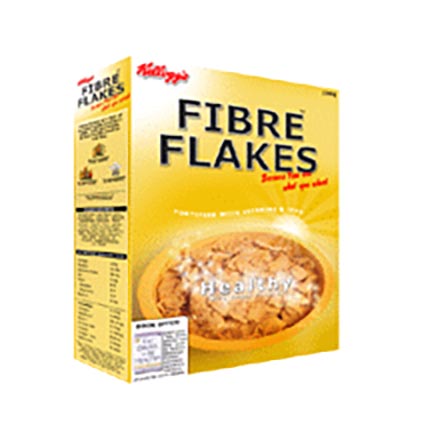
Now we have to do the same with the side....
Click the layer that has the Side image on it to activate that layer, go to Edit>Transform>Perspective (I can see your getting the hang of this now right?)
This time click the BOTTOM LEFT point and drag it up, use your eyes to judge how far up. Again, Use Free Transform to squash it a little.
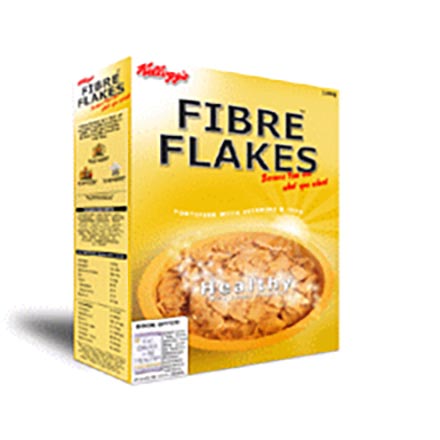
Its starting to look good, now move the side next to the side, next to the front...it should look similar to mine opposite.
4
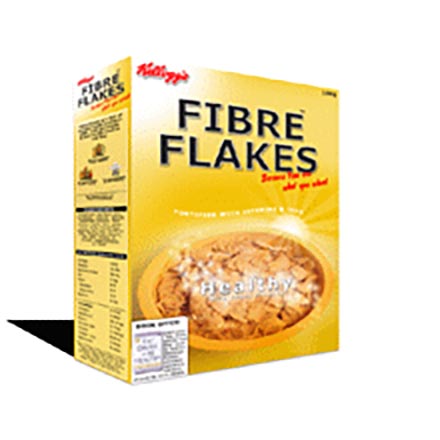
Now all we need are some shadows and finishing touches.
So click the UPPER MOST layer (the one at the top of the layers palette) and merge the two layers together by pressing "CTRL + E" so that the side and the front are now on the same layer. Now go to Layer>Layer Styles>Drop shadow and match it with:Blend mode multiply, colour black, opacity 32, angle 90, distance 2, spread 0, size 2. OK that just makes it look a little better.. Now to create a perspective shadow...
Click the bottom "background" layer.. Then Create a new layer, it will be behind the box layer, now using the Polygon Lasso create a selection like the one shown in the pic opposite. Then fill that selection in with black.
5
Now Deselect (CTRL + D)
go to Filter>Blur>Guassian Blur and enter a setting of about 9 (whatever looks good)
then lower the opacity of that layer to about 65% (again, whatever looks good)
OK now its looking pretty good, last thing to do is make your showroom background, this is very easy.
6
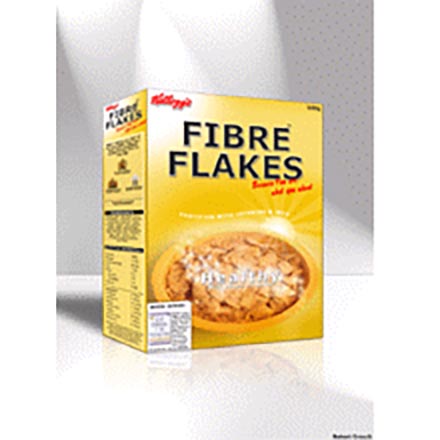
Click on the background layer to activate it, now create a new layer, fill this layer with white (completely) now go to Filter>Render>Lighting effects... Choose "five lights up" and just mess around with all the settings, when happy click "OK" and then you may want to lower that layers opacity just a little, that's it your done!
Optional: you could also add a simple reflection too :)
That's it, hope you found this useful. If you go to my gallery you can see this applied to a CD box and a software box.
This tutorial was brought to you by Robouk, please post any questions in the forum. Thank you.